Home > SMT Peripheral Equipment
PCB Circuit Repair Machine
Specifications:


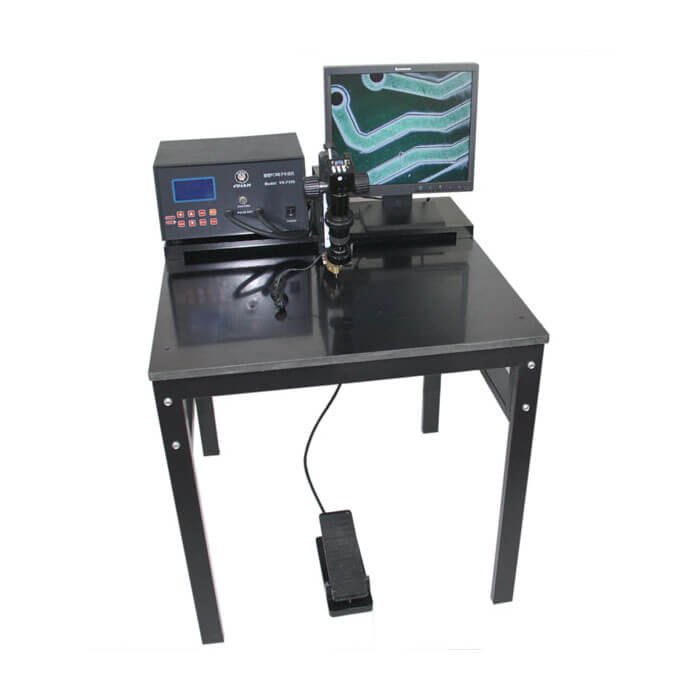
PCB Circuit Repair Machine is a new product developed by our company after the precision electronic spot welding machine. It is a special equipment designed for PCB manufacturers to repair circuit boards. The precision electronic wire repair machine can repair various circuit boards, which is easy to operate and reliable in welding. The repaired circuit boards can also perform hot oil scrubbing, strong vibration and electrical performance load work.
PCB Circuit Repair Machine is a device for digital repair and fine repair welding under the direct view of the display screen. It sets three sets of adjustable welding parameters: welding pressure (Force), output pulse amplitude (Voltage) and pulse time (Millisecond). The precision electronic wire repair machine is composed of A. host, B. structure, C. welding head, D. head, and E. optical device.
A. Host
The main part of the precision electronic wire repair machine is the control part of the power supply. The circuit design adopts adaptive adjustment technology and is provided with a certain value of automatic limit protection to ensure a certain energy output and ensure the best welding quality.
B. Structure
The gantry structure is adopted to shorten the extension length of the machine head and reduce the vibration caused during welding.
C. Welding head
A welding head is a component that performs welding work. When working, when the welding head is in contact with the line to be repaired and reaches the set welding pressure, the welding host can be triggered to provide a pulse current, so that the tip of the welding head generates energy to perform fusion welding.
D. Machine head
The machine head is a mechanical device for manipulating the welding head for welding work and providing adjustable welding pressure. Through the pedal operation, the welding pressure is displayed digitally. When working, the display is enlarged to ensure accurate positioning of the welding head and easy operation.
E. Optical devices
This part consists of a microscope, its stand, and a light source. Adopt a microscope with continuously adjustable magnification and a specially designed bracket, which makes the adjustment of the microscope up, down, front, and angle very flexible and convenient; the light source is provided by a special LED lamp, the light is soft and natural, and the life is long, effectively reducing eye fatigue and improving work effectiveness.
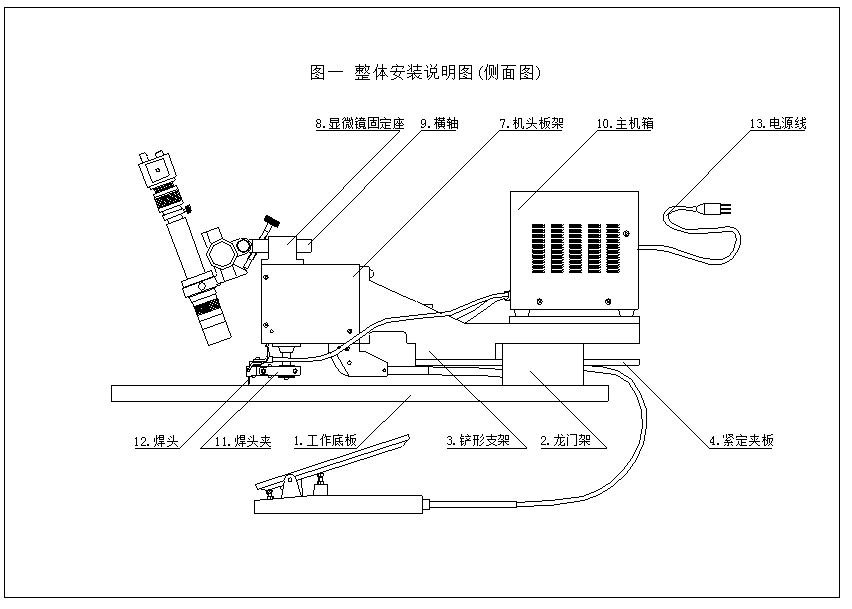
Installation operation:
Installation process: 1. ① The gantry is fixed on the working floor → ② The shovel bracket and the clamping clamp are fixed on the gantry → ③ The square bar and the display support plate are fixed on the gantry.
2.①The sprocket seat is fixed on the plate frame → ②The plate frame is connected with the foot pedal → ③The plate frame is connected with the shovel bracket
3. Installation of optical system
1. Install structural support (see Figure 3)
(1) Fix the gantry base 2 on the work floor through the hole on the work floor 1 with screws.
(2) Fix the spade bracket 3 on the gantry base 2.
(3) Fix the square rod 5 to the left of the gantry frame 2.
(4) Fix the display support plate 6 on the right side of the gantry frame 2.
Note: The main box is placed on the shovel bracket and the square pole, and the monitor support plate is used to place the monitor or monitor.
2. Install the head plate (see Figure 1)
Fix the machine head to the front of the spade bracket with two M10 screws.
3. Connection between the foot pedal and the head board frame (see Figure 5)
(1) First pass the foot pedal cable through the gantry.
(2) Screw the cable head ③ into the chain end ④.
(3) Press down on the bottom bracket and snap the cable end ① into the hole on the sprocket seat, so that the chain ⑤ and sprocket ⑥ fit together, and then tighten the screw ⑩.
4. Installation of microscope and fixed base (see figure 7)
The microscope support is fixed on the microscope fixing base 8 through the horizontal axis 9, and the horizontal axis can be locked with the M6 hex socket set screw ①.
5. Installation of optical system (see Figure 7)
(1) Connect the CCD camera ⑤ to the microscope ③ through the CCD interface ④.
(2) Then insert the microscope into the 8 circle of the microscope holder and tighten the screw ⑥.
(3) Fix the fluorescent light of stereo microscope on the eyepiece of the microscope or the connecting parts with three screws.
6. Connect
(1) Place the main box on the square pole and shovel bracket.
(2) Insert the five-core cable of the machine head into the corresponding hole on the front panel of the main box.
(3) Fix the two output cables of the host to the top of the welding head clamp with screws ① (in Figure 6).
(4) Place the monitor on the monitor support board, and connect the CCD video output terminal to the monitor video input terminal with a video cable.
7. Welding head installation (see Figure 6)
Loosen the screw ④, put the welding head 12 into the clamping position under the pressing piece ③, and then slowly tighten the screw ④. During this process, adjust the two welding heads so that the two welding heads are aligned in parallel (the same height and the same plane). When welding, do not short the two welding heads, otherwise you cannot weld.
8.Adjustment
(1) Left and right of the image cannot be centered: Adjust the horizontal axis 9.
(2) The top and bottom of the image cannot be centered: Adjust the angle adjustment screw ② in Figure 7.
(3) Change of magnification: adjust the microscope zoom circle, ⑦ in Figure 7.
(4) The distance between the two welding heads: adjust the gap adjustment screw ⑤ in Figure 6.
(5) Distance between welding head and worktable: adjust the pedal screw ④ in the attached picture 4.
9. Startup work
Plug in the power cord (13 in Figure 1), turn on the power switch, and adjust the parameters according to the welding needs to work.
10.Maintenance of welding machine
(1) Do not open the main box cover and the head cover.
(2) The contact surface between the bottom bracket and the bearing should be kept clean and dry.
(3) When the welding machine is not in use, please cover the dust cover.
11.Maintenance of welding head
The welding head is used as a welding part to prevent deformation due to impact; it should be kept clean to ensure good electrical conductivity. If the surface oxidation is severe and affects electrical conductivity, the welding head should be removed and polished with sandpaper.
12.Technical specifications
Input power 110V / 220V ± 5% 50 / 60HZ Optical auxiliary option:
Welding voltage DC 0.01 ~ 1.99V LED lamp
Welding time 0 ~ 19ms
Welding pressure 10 ~ 70OZ CCD (camera)
Maximum welding power 500VA 19 ″ color LCD display
Welding head stroke 5 ~ 10mm
Worktable size 800mm × 950mm
Maximum working size 700mm
Keywords:
SMT Reflow Oven, Lead free Reflow Oven, High end Reflow Oven, Reflow Soldering Oven, Reflow Oven Manufacturer, LED Reflow Oven, PCB Reflow Oven, Nitrogen Reflow Oven, Customized Reflow Oven, Dual Rail Reflow Oven, China Reflow Oven.


Contact: Mr Tommy
Phone: +86 13691605420
Tel: +86 -755-85225569
Email: tommy@flason-smt.com
Add: 94#,Guangtian Road,Songgang Street,Bao an District Shenzhen China